Cinema 700 - Connecting to Klipsch Connect App
Note: in the images below, you will see the Cinema 800 displayed instead of the Cinema 700. However, the process for connecting is the same.

- Begin by tapping on the Klipsch Connect app from your mobile device's home screen
- Note: If this is your first time using the Klipsch Connect app, you will first need to agree to terms and allow permissions as initial setup for the app. Once past this initial step, you will be met with a list of detected Klipsch Connect compatible products. Tap the Cinema 700 to begin setting up.
- Once on the home screen of the app, you can tap the '+' icon in the top right corner to begin setting up a new product
- Scroll down until you see the Cinema 700 and tap on it
- Note: For this example, we will tap on the "Cinema 700", however, if you have purchased the 5.1 bundle that includes the Surround 3 Wireless Surround Speakers, you will want to tap on the "Cinema 700 5.1 Sound Bar" option
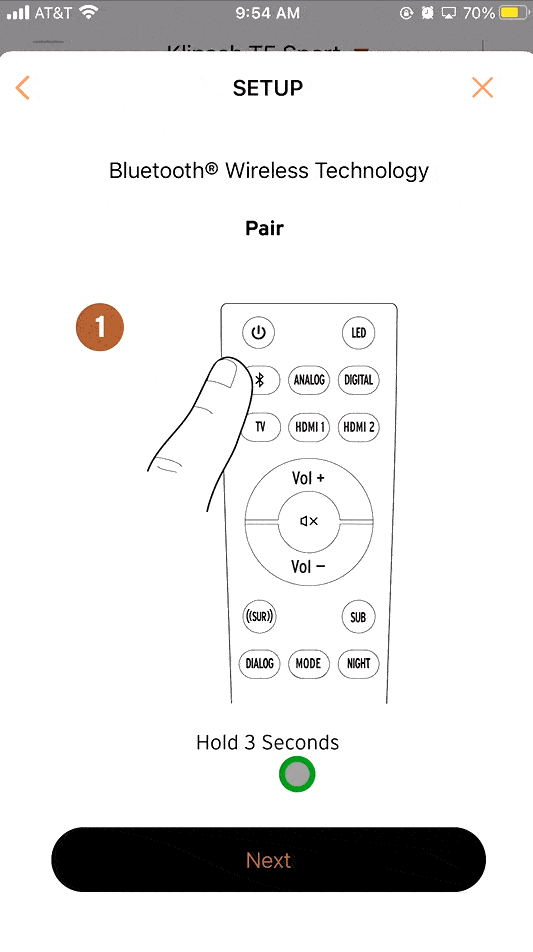
- The app will prompt you to put the Cinema 700 into Bluetooth pairing mode by holding the Bluetooth button on the remote for ~3 seconds
- Note: You may need to hold it slightly longer than 3 seconds, or until you see the bar's LED screen display 'BT PAIRING'
- If prompted, allow the access to connect to devices on your local network so the app can successfully connect to the Cinema 700
- Choose "Cinema 700 5.1 Sound Bar" or "Cinema 700 Sound Bar", depending on which version you have and tap 'Next'
- The app will then show you the network information it is connected to
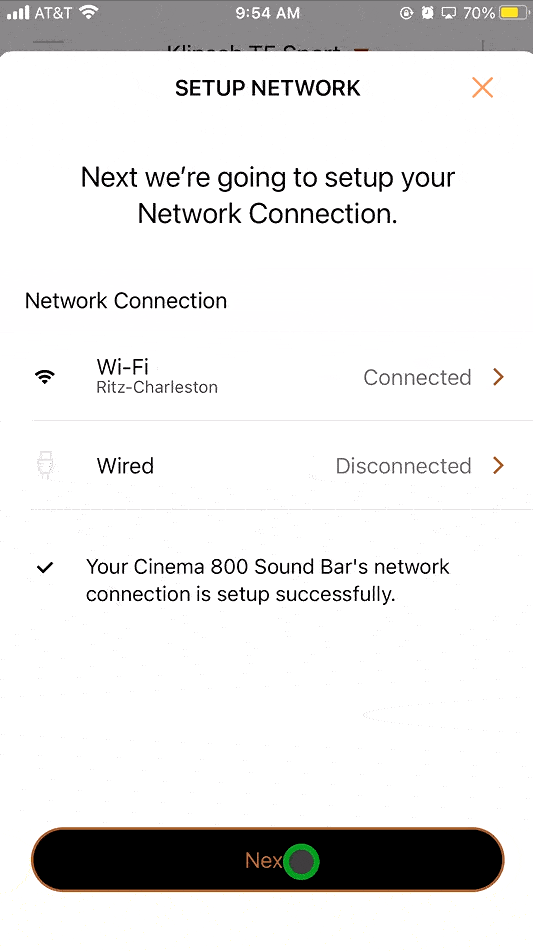
- Once the connected network information is displayed, tap 'Next'
- You can then give the Cinema 700 a custom name, if you would like
- Note: For this example, we will simply title it "Living Room speaker"
- After naming the Cinema 700, you will then be given the option to begin Amazon Alexa setup
- Note: For this article specifically, we will skip the Alexa setup. If you would like to view the full Alexa setup, please see our article - Cinema 700 - Connecting to Amazon Alexa
- Next, you have the option of registering the product, if you would like. Or, you can simply tap 'Skip' to move to the next section
- Note: Registration is not mandatory for any warranty purposes
- Once the Cinema 700 is set up and ready to play, you can tap 'Done' to complete the setup, or you can tap 'Quick-Start Guide' to view some quick initial guides on how to connect the Cinema 700
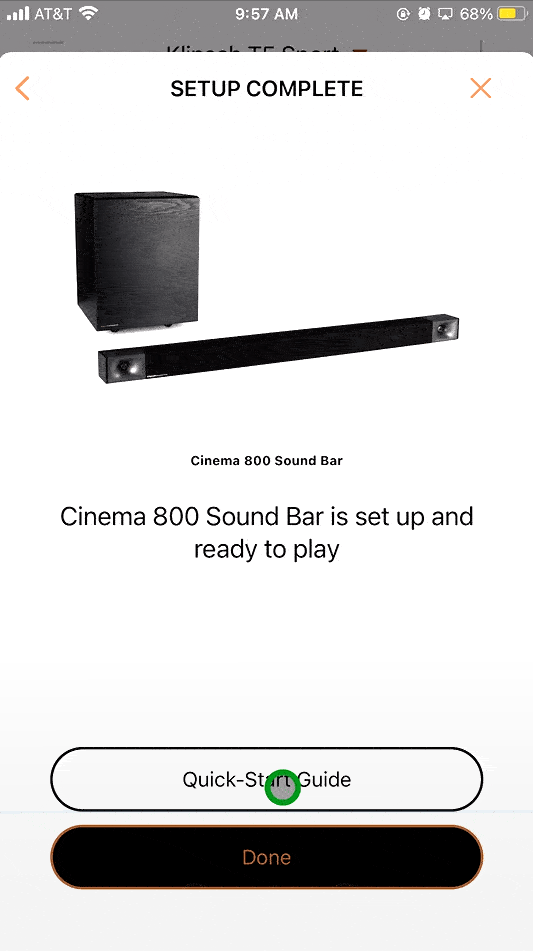
- For this example, we will tap the 'Quick-Start Guide' to swipe through some of the highlighted connection options
- Once you have reached the end of the 'Quick-Start Guide' tap the 'X' in the top right hand corner
- The app will then take you to the home screen of the Cinema 700 where it will now auto-connect anytime you open the app and choose the Cinema 700 product
For assistance on setting up the Cinema 700 in the Google Home and Amazon Alexa app, please see our articles - Cinema 700 - Connecting to Google Home & Cinema 700 - Connecting to Amazon Alexa
If you already have the Klipsch Connect Plus app downloaded, please ensure that you are running the latest version, which is 2.2.2 or greater. To view which version of the app you are running - open the app and, from the product home screen, tap the three lines located in the upper left hand corner. You will then see the app version listed at the bottom of the tab, i.e. "Version: 2.2.2".
The Cinema 700 is compatible with the Klipsch Connect app to bring you additional features and connectivity. Below, you will find additional text and looped videos (.gifs) to assist you in setting up your Cinema 700 on the Klipsch Connect app.
First, you will need to download the Klipsch Connect app:


Comments
0 comments
Please sign in to leave a comment.